Favorite Blogs


Favorite Stores


Sunday, September 30, 2018
Antique Harmony PTU Tutorial

This tutorial was written by Ashley Zimmerman on 9/29/18
Any resemblance to any other tutorial is coincidental.
Any resemblance to any other tutorial is coincidental.
Supplies I Used:
PSP – I used 2018 but any version will do
Tube of Choice
Font of Choice
AoRK-Mask 502 & 450 by Rebel Dezigns you can get all her masks here
Eye Candy 4- Gradient Glow
PSP – I used 2018 but any version will do
Tube of Choice
Font of Choice
AoRK-Mask 502 & 450 by Rebel Dezigns you can get all her masks here
Eye Candy 4- Gradient Glow
I Used 2 Kits in this tag "Melodic Symphony" & "Symphonic Melody" by Rebel Dezigns
-Melodic Symphony here
-Symphonic Melody here
-Melodic Symphony here
-Symphonic Melody here
I used the amazing artwork of Enys Guerrero (Individual Tube 9-3) here
You can purchase her work and a license from CDO
You must have a license to use Enys's Work.
You can purchase her work and a license from CDO
You must have a license to use Enys's Work.
NOTE: I will tell you which kit I am in and out of as we go along ! Its kind of a tough tutorial as I am going back and forth between two kits !
Lets Begin!!
Open a new canvas 750x750
From Symphonic Melody kit
Open frame 6 : Image - Free Rotate - Rotate right 90 degrees
Then adjust - sharpen and resize 80%
Rename “Middle Frame”
Open frame 15 - image - resize to 50% sharpen and place to the right side of Middle Frame - rename “right frame”
Duplicate frame 15 -
Image - Mirror Horizontal rename “left frame”
Activate Middle Frame in your Layers Pallet Grab your Magic Wand and select inside each section of the circle (3 selections )
Now activate Left Frame and hit DELETE , activate Right Frame and hit delete

Open paper 24 - Image - Resize by 400 pixels - sharpen - copy and Paste As New Layer and move under Right Frame
Using your selection tool, freehand, draw above the frame. Keep your paper layer
highlighted, go to 'Selections' on your menu bar - Invert - and then hit the delete key. Selections - Select None.
REPEAT for Left Frame


Open your tube (Raster 3) copy and Paste As New Layer move under middle frame - duplicate your tube
Adjust , blur , Gaussian blur radius set to 5 , blend mode - overlay - reduce your opacity to about 81% - merge down add drop shadow I used
V: 4 H:3 Opacity : 70 and Blur : 7
Now with your selection tool select the part of your tube you want above your frame
Selections, Promote Selection to layer
On the original, press delete Selections, None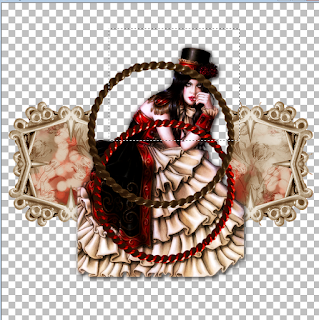

Move the promoted selection to the top of the layer palette
Layers, Arrange, Bring to Top
Erase any of the original tube layer you can see below the frame and also in the first section of the frame

Activate Middle frame on your layer pallet
Grab your magic wand and again click in the 3 sections of the frame
Selections , modify , expand by 5
Now using Melodic Symphony kit open paper 18 resize by 500 pixels sharpen copy and Paste As New Layer - move down under all the other layers
Selections , invert , delete
Selections select none
Duplicate paper - now adjust - blur- Gaussian blur same settings as above - blend mode - soft light
On Middle Frame add drop shadow same as above
Open your tube (Raster 2) copy and paste as New layer move under right frame using the same selection method (Freehand as above draw around your right frame ) selections , invert delete , change your blend mode to overlay
REPEAT this step for the left frame BUT flip your tube horizontal
Now Add drop shadow to Left and Right Frame
For all elements placed we will be using the same drop shadow ( V: 4 H:3 Opacity : 70 and blur 7 ) and resizing elements at 50 % . I will note if I change it as I go through my tag
Element from Symphonic Melody
Open element 2 Image , resize , sharpen and add drop shadow send to bottom and move to the right between Middle and Right Frame
Elements from Melodic Symphony
Open element 11 resize , sharpen , add drop shadow and move to the right of element 2
Open element 13 resize , sharpen , add drop shadow and move to the left of elements 2 and 11
Open element 10 resize by 50% BUT do it two times ! Sharpen , add drop shadow and place above Right Frame
Open element 6 resize , sharpen move under Middle Frame - Image , Free Rotate , Left at 45 degrees
duplicate - adjust , blur , Gaussian blur same settings - blend mode soft light - merge down reduce the opacity to about 46 %
Open element 24 resize , sharpen move under Middle Frame - Image , Free Rotate, Right at 45 degrees and place to the right side as seen below (erase any parts that are visible outside the circle or over to the left
Open element 34 RESIZE at 75% sharpen and move below elements 6 and 24 place to the left to fill in the remaining section of the middle frame - blend mode darken - erase any parts sticking out from frame
Open element 106 resize to 50% - Image , Free Rotate , Left at 45%
Open element 106 again resize to 50% - Image , Free Rotate , Right at 90 %
Open Element 106 resize by 50% twice and duplicate so you have 3 in total and place as seen below
Merge down all of your 106’s and add drop shadow BUT this time use
V: -1 , H: -1
This is filling the other blank section to the left side of our frames
Elements from Symphonic Melody you can use my tag as reference on where to place elements!
Element 36 resize to 40%
Element 49 send to bottom place to the left , sharpen add drop shadow duplicate - Image , mirror horizontal
Element 77 send to bottom resize to 40% place to the right to fill in between the frame and piano - sharpen add drop shadow duplicate flip horizontal
Elements from Melodic Symphony
Element 21 resize 45% do this twice Sharpen and add drop shadow
Element 22 resize 45% do this twice
Sharpen add drop shadow
Element 59 resize 45% do this twice sharpen add drop shadow
Element 65 resize 45% sharpen add drop shadow
Element 68 resize 45 % sharpen add drop shadow duplicate move slightly to the left of original element
Element 84 resize 50% sharpen add drop shadow
Element 108 resize 50% twice sharpen add drop shadow
Elements from Symphonic Melody
Element 14 resize 50% twice sharpen add drop shadow
Element 18 resize 50% twice sharpen add drop shadow
Element 37 resize 50% twice sharpen add drop shadow
Element 50 resize 50% twice sharpen add drop shadow
Element 53 resize 50% sharpen add drop shadow
Element 58 resize 45% sharpen add drop shadow
Element 78 resize 50% twice sharpen add drop shadow place to the left duplicate - Image , mirror horizontal
Element 91 resize 50% twice sharpen add drop shadow place to the right duplicate and place over to the left where you would like
Element 94 resize 50% twice sharpen add drop shadow
Element 105 resize 50% twice sharpen add drop shadow
Element 106 resize 50% twice sharpen add drop shadow
Element 115 resize 50% twice sharpen add drop shadow
Element 112 resize 50% sharpen add drop shadow send to bottom place over to the left
Open word art 1 resize 50 % twice sharpen add drop shadow and place to the right like mine
Open word art 5 resize 50% twice add eye candy glow 4000 style medium and with these settings

From Melodic Symphony
open paper 22 sharpen copy and paste as New layer - Layers load mask AoRK-Mask 502 merge group and resize 95%
open paper 21 sharpen copy and paste as New layer place above other mask layer apply mask AoRK-Mask 450 merge group resize to 93 %
Crop away any excess canvas
Add copyrights and save ! And add your names !

Subscribe to:
Post Comments
(Atom)
My CT's


0 comments ♥:
Post a Comment